
3 Fun Art Activities For Kids In The Holidays
Posted by Aileen Cuaresma on Sep 16, 2024

The holidays are upon us, and like most parents, you're probably looking for ways to entertain your kids and keep them busy at the same time. There are plenty of easy eco-friendly ways to make this season even more festive while getting your kids in the holiday spirit.
These three simple and quick Christmas crafts in a few minutes using materials that already probably have around your home! You and the whole can make these cute holiday DIY projects without the need for special tools and skills. Have fun!
Milk Carton Cookie House
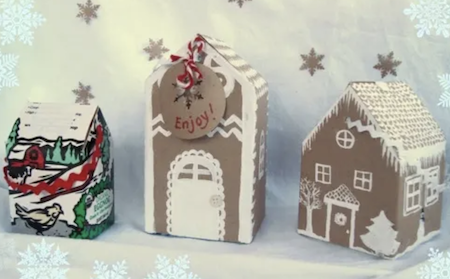
If you love to bake an assortment of holiday cookies and bars every year to give as gifts to family and friends, packing them up can be a bit challenging. This year, why not make it even more personal these easy-to-make cookie houses made from milk cartons? It's a cool project from Mayamade Blog that your kids will surely have fun creating with you. You can even decorate it just like your baby girl's favorite dollhouse.
Materials:
- Clean and dry milk carton
- Scissors
- Pencil
- Hole punch
- Glue or paste
- Brown paper or wrapping paper
- Non-toxic white paint
- Ribbons or twine
- Label or sticker
Instructions:
- Using a scissor, open the milk carton. Cut all four sides down to the folds and remove.
- Cut directly down all four corners and fold two opposite sides together to form a roof.
- Place your milk carton on a flat surface and hold the roof pieces together to form the template for cutting the A-framed sides. Trace the triangle with a pencil and cut. Adjust the height if necessary.
- Place your carton corner on the corner of your paper. Trace the shape of the carton as you carefully roll it over for all four sides. Add an inch in height to all of the flat edges to ensure extra for folding over.
- Cut out paper and adhere with glue or paste. I ended up using a combination. Fold over flat top edges and secure with clothespins until dry.
- When dry, paint and decorate.
- To place the handle, punch holes into the A-frame and tie on a ribbon.
- Now it's time to fill it with your delicious homemade cookies or bars! You can make little wax bags to separate the cookies by folding over a length of wax paper and zigzagging the sides shut with peppermint thread
Salt Dough Santa Handprints

Make this season even memorable with your little ones with this adorable salt dough Santa handprints. This is a keepsake that's very easy to make and inexpensive. Decorating it will not take too much of your time either, and your kids will enjoy every minute of it.
These Santa handprints from Baby Cinco Kids are something the whole family will treasure for years to come. You can even make it a yearly tradition so that your child will see how big his hands have become each year!
Dough ingredients:
- 1/2 Cup of Salt
- 1 Cup of All Purpose Flour
- 1/2 Cup of Water
- A sprinkling of Cinnamon for a festive scent (optional)
Baking instructions:
- Preheat your oven to 120 °C and line baking tray with baking paper.
- Mix flour and salt in the bowl then gradually add water, stirring until combined
- Turn dough onto lightly floured surface, roll out until about 7mm thick and transfer to a baking tray
- Press your kiddo’s hands onto the dough and cut them out leaving about 2mm edge. You can make ornaments with the leftover dough, just use some nice cookie cutters
- Use a knitting needle or a chopstick to make a hole at the top of the palm, about 1 cm from the top edge. This will be used to string the twine through
- Bake for at least 3 hours, turning them once after 2 hours. You can easily leave them in longer or even overnight!
Materials for decorating:
- White, red, black, and skin tone non-toxic acrylic paint
- Acrylic gloss varnish (optional)
- Twine
Instructions:
- First paint the entire print white twice, waiting about an hour between coats
- After the second one dries completely sketch the outline of the hat, the pom-pom and the face with a pencil
- Draw a face (without the eyes, nose, and mustache) and a hat (without the dots) using two coats again. But always remember to wait for about an hour in between! You probably have some red paint left so use that for the nose.
- Now draw the fur on Santa’s hat and lastly the rest of the face (eyes and mustache) and the tiny dots on the hat. Leave to dry.
- You can stop here and string the twine through the hole or you can seal the ornaments with two or more coats of Gloss Varnish, which will make the ornaments last for ages! Plus they look so much nicer with some extra gloss on them
Paper Cup Luminary Angels
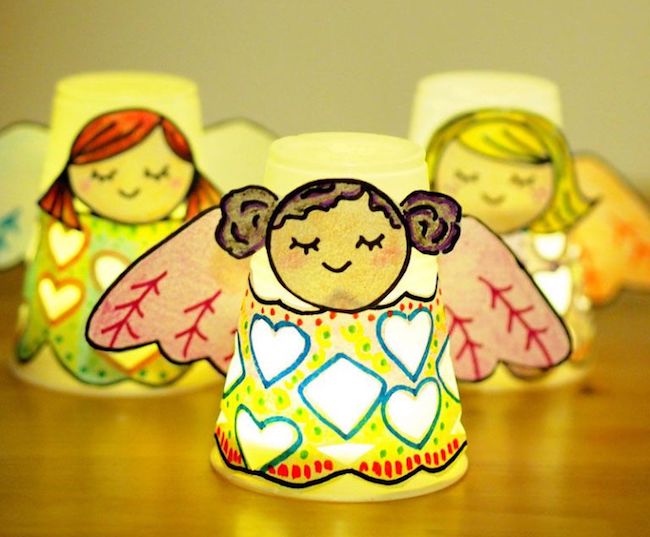
Christmas is all about that magical and warm feeling. And what better way to get that sense but with angels all lit up and warming up the cold winter night. These sweet little cup angels from Molly Moo Crafts are simple to create and perfect for giving your home a dash of holiday spirit and warmth, especially when your kids are unwrapping their gifts under the Christmas tree! Kids will have a great time assembling, decorating, and lighting these charming little lanterns themselves.
Materials:
- Clear Plastic Cups
- Printer paper
- Pen
- Crayons
- Sharpie Markers
- Scissors
- Clear Tape
- LED Tea Lights (1-2 per angel)
Instructions:
- Roll your plastic cup over a sheet of paper and trace along its edges as it rolls.
- Cut the shape out, and trim off about 1 to 1.5 in off the top so that you’ll have space for the angel’s face.
- Color in the curved shape, and then accordion fold it.
- Cut out different shape holes just like when you're making snowflakes.
- Open up your folded piece of paper. Use Sharpie markers to add more decorations to your design. Cut out and colour a face and pair of wings.
- Tape your dress, face, and wings onto your plastic cup.
- Place 1 to 2 LED tea lights under each cup to make your angels glow.